


Final Build Photos


Please rate this ride   (4 votes, average: 4.75 out of 5) (4 votes, average: 4.75 out of 5) |
| Submitted By | |
| David Palacios | |
| Upland, Califoria, United States of America | |
| Build Information | |
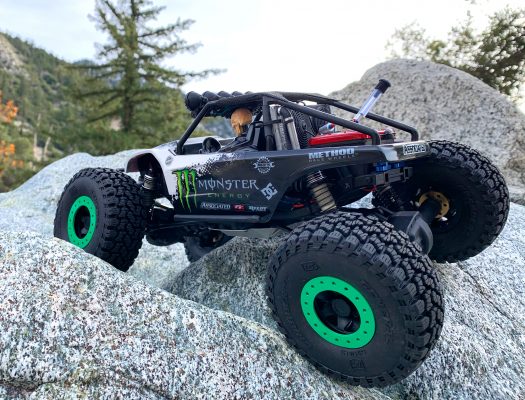
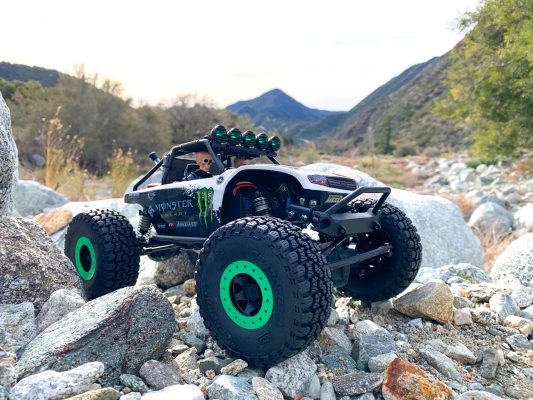
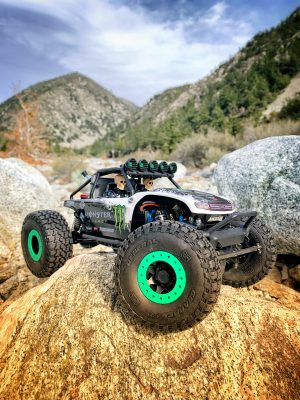
| Readers Ride Title | Monster Energy CR12 Custom Build |
| Vehicle Class | Rock Crawler |
| Chassis Brand | Team Associated |
| Chassis Model | CR12 |
| Body Brand | Axial |
| Body Model | Yeti Jr |
| Power System | Electric |
| Electric Motor Brand and Model | Reedy Power CR380 Brushed motor |
| Speed Control Brand and Model | Reedy Power SC400 |
| Battery Brand and Model | Reedy Power WolfPack 7.4v LiPO |
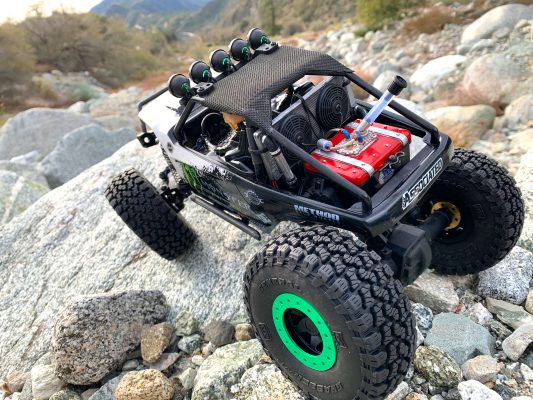
| Wheels and Tires Brand and Model | Element RC 1.55 Trigon wheels in black with custom aluminum beadlock rings. Element General Grabber A/TX1.55 tires. |
| Shocks Brand and Model | Factory Team CR12 aluminum shocks |
| Axles Brand and Model | Team Associated CR12 |
| Paint Brand and Model | Tamiya white and black. |
| Graphics Brand and Model | Custom printed Monster energy decal sheet. |
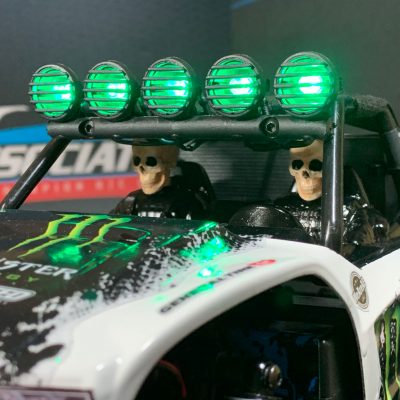
| Scale Accessories Brand and Model | Axial radiator with scratch built hoses and wires, Team Associated NTC3 receiver box converted to look like a fuel cell with scratch build details, Team Associated CR12 light bar and two hand painted 1/12 scale skull heads to replace the drivers helmets. |
| Light System Brand and Model | Custom wired light bar LED's in green and Team Associated rock lights |
| Radio System Brand and Model | Stock XP120 radio system with Reedy RT1408 low profile Hi-torque servo. |
| Other Options Brand and Model | Replaced all gears with GPM metal gears for the Thunder Tiger Kaiser which is basically a Team Associated CR12 since Thunder Tiger is the parent company of Team Associated. |
| Further Description/Back Story | I had a CR12 chassis sitting in my hobby room with no body, wheels, tires or electronics. I also had a Yeti Jr body collecting dust. I was looking for a new project and came across the two and they just naturally fit. The CR12 wheel base was perfect but the chassis rails were too long. So, I needed to chop the rear rails just behind the shock towers and chop most of the front as well. I relocated the steering servo back to where the shock towers were and had to relocate both front and rear towers further inboard to fit under the body. The steering servo also doubles as the front body mount with a pad of hook and loop. The rear of the body is hinged on the chassis rails to allow changing the batter easy. The whole build process can be seen on my Instagram @MyBuildProjects |
Build Process Photos
No Photo Uploaded


![RC Car Action - RC Cars & Trucks | This 1/3 scale 125cc V10 Buggy is CRAZY [VIDEO]](https://www.rccaraction.com/wp-content/uploads/2018/05/V10-HP.jpg)


 Stay up to date with the latest information, sign up for our FREE newsletter today.
