

Tamiya Grand Hauler 389
Shane McManus « Poplar Grove, IL
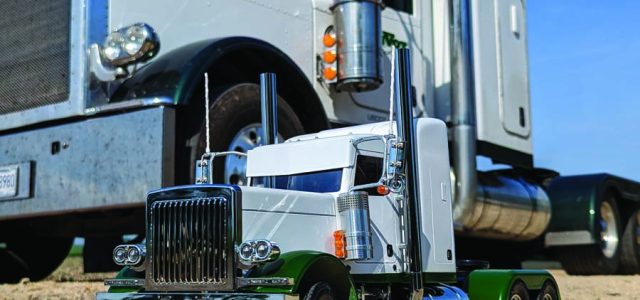
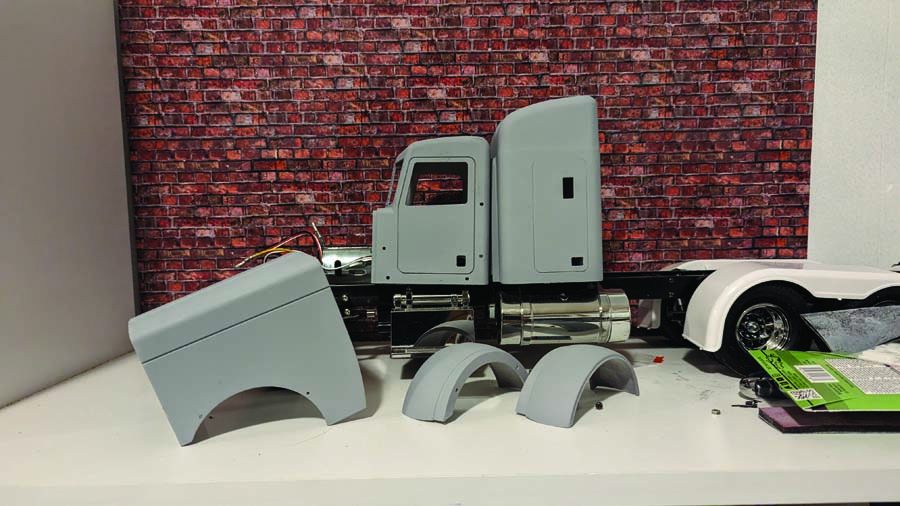
RC big rigs are a big deal and Shane’s sports many custom parts and detailed work that take it over the top. “It’s been a while since I’ve built a semi, or just done an RC build in general,” Shane explains. “So, I started to get parts together to build a replica of the 1:1 I currently drive, a 389 Peterbilt with a 48-inch stand-up sleeper. The chassis is a Tamiya Grand Hauler. I ended up shortening the frame by a couple inches to match the full-scale truck. For a body I went to Shapeways; I ended up getting the hood, front fenders, cab and sleeper, all from them. It took a lot of sanding and prep work to make the body perfectly smooth for paint since it was all 3D printed. The sleeper was the most time-consuming to make. It’s actually made from a 48-inch flat-top-style sleeper and a piece that is actually designed to go onto the Grand Hauler sleeper to make it a stand-up version. With some epoxy, body filler and Rustoleum Primer/Filler, I was able to make it into a 48-inch stand-up sleeper.” Shane fills us in on how he got the 3D-printed parts so smooth: “The best way I found to smooth out a 3D-printed body is by first doing an initial sand at 220-grit. After cleaning the body, do several light layers of Rustoleum Primer/Filler. After a day of curing, I hit it with a few more coats to help build up the imperfections. The key is to then let it cure for several days before sanding it. I started out at 300, then worked my way up to 5000. If I saw more imperfections, I repeated the process again by hitting it with more Primer/Filler. The mirror brackets are homemade to match a 389. I used aluminum tubing I got off of Amazon. It was very tedious to bend them just right without them breaking. Micro LEDs fit perfectly behind the watermelon lights, with the wire running through the mirror bracket. The cowl panels were also homemade; initially I used roof flashing to make prototypes. After getting the right design down, I then used metal for duct work to make the final product. It’s very rigid but still easy to work with. The hood actually opens, showing off a scale engine. It fits right over the brushed motor on the stock Tamiya 3-speed trans. Overall, I’m happy with how this project has turned out. I will eventually probably get an MFC for it and continue to add little details. Until then, I’ll enjoy running it around whenever I’m not in the 1:1.” Truly fantastic job, Shane!
BUILD HIGHLIGHTS
– Chassis: Tamiya Grand Hauler
– Body: Customized Shapeways 3D-printed 389 Peterbilt with 48-inch stand-up sleeper
– Motor: Tamiya silver can brushed 540
– Speed Control: Hobbywing 1080 brushed ESC
– Battery: 2200 mAh 2-cell LiPo
– Wheels & Tires: Stock Tamiya Grand Hauler
– Paint: Tamiya primer & paint, Racing Green & Pure White, Rustoleum Primer/Filler
– Other Options: Parts supplied from Hobbytown USA Rockford, IL, True-Scale RC, GardenTrucking.com, Semi Joe RC Truck Stop, Amazon
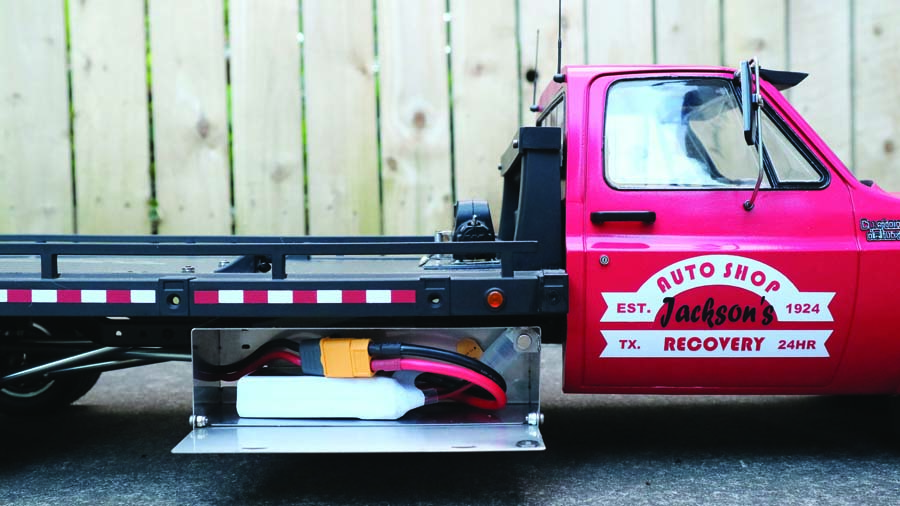
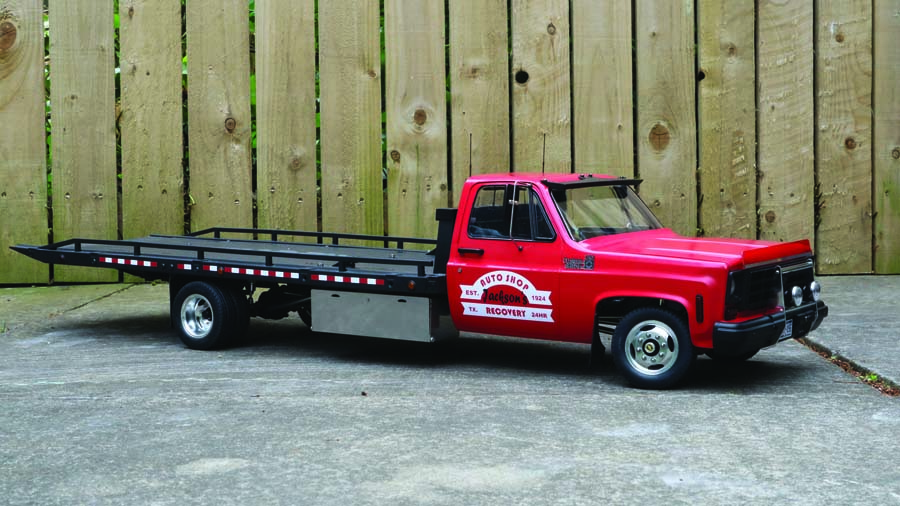
Chevrolet K30 Flatbed Recovery Truck
Stuart Pardue « Edinburgh, Midlothian, United Kingdom
We love seeing passion projects and Stuart’s K30 Flatbed sure is a great example of one. Stuart fills us in on his unique build: “I started working on this truck exactly 12 months ago. I wanted a scale on-road flatbed recovery truck. At that point the Cross RC WT4 didn’t exist and the Traxxas Hauler as a complete package wasn’t scale enough for my liking. I purchased a CEN F-450 truck and stripped the chassis right back. I then set about installing the Axial SCX10 II axles with the help of some custom links to work with the preexisting CEN link mounts. I also installed an Axial SCX10 II skid plate so I could run an SSD aluminum scale transmission. Power distribution from the gearbox is sent to both axles via a triple set of Lesu polished aluminum scale driveshafts. The rear drive is split in two with the help of a Lesu carrier bearing. To get the Traxxas Hauler bed to fit the CEN chassis the bed itself was heavily modified to keep it down low. The bed is attached to the chassis rails via a sleeve bearing that also gives the bed its tilting action. To power the bed, I set about installing two Actuonix L16 R 50mm linear actuators. These actuators are three-wire versions so they operate exactly the same as a normal servo. This means they plug directly into the receiver and can have trim and end point adjustments set accordingly. The Chevrolet body started life as an RC4WD K5 Blazer which was subsequently chopped in half and had a Shrink RC cab-back panel installed. The cab has been adorned with subtle but pleasing accessories such as the 3D-printed sun visor, bug deflector and CB antennas. There is also a pair of Xtraspeed truck wing mirrors installed for greater effect. Because the battery and receivers have been located in the custom side lockers, there is room in the cab for a floorpan, door cards, bench seat and a GRC Traxxas Blazer dash.” Great work, Stuart, we really like the highly detailed machine you’ve built!
BUILD HIGHLIGHTS
– Chassis: CEN Racing F-450
– Body: RC4WD K5 Blazer
– Motor: Hobbywing Fusion SE 1200kV
– Speed Control: Integrated ESC in Hobbywing Fusion motor
– Battery: Gens Ace Soaring 2200mAh 2S LiPo
– Wheels & Tires: Integy 8-lug single and dually 1.7 wheels wrapped in RC4WD 1.7 LoRider tires
– Shocks: RC4WD Bilstein 50mm internal spring shocks
– Axles: Axial SCX10 II axles front and rear
– Paint: Toolbox Red and matte-black acrylic automotive paint
– Graphics: Custom vinyl door graphics and flatbed reflective markers created by Stuart Pardue
– Radio System: Flysky FS-i6S 10-channel
– Other Options: Actuonix L16 R 50mm 210:1 RC linear actuators x2, Traxxas Hauler flatbed, KK Truckstore custom side lockers, RC4WD Warn scale winch, Warn front axle lockers, SSD rear axle hubs, 3D-printed sun visor, custom-made bug deflector, truck wing mirrors, King Kong RC fuel tank, custom mudflaps front and rear, Texas license plates

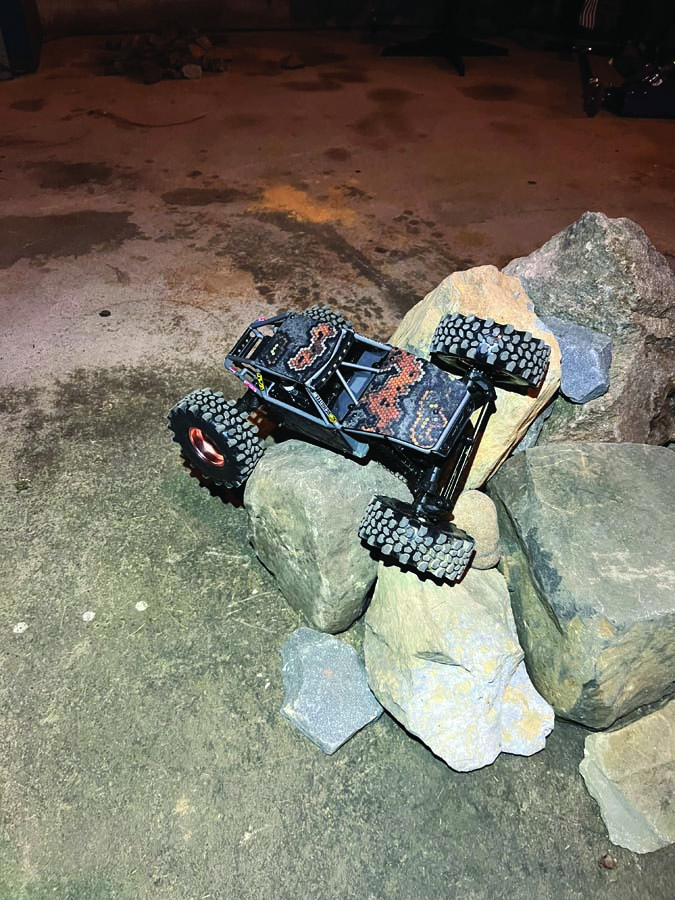
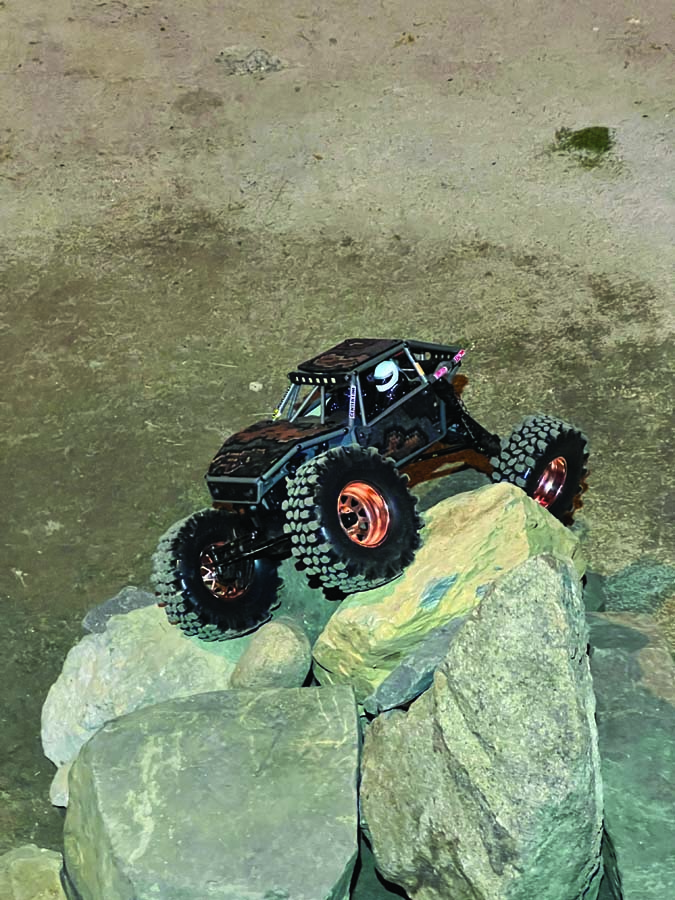
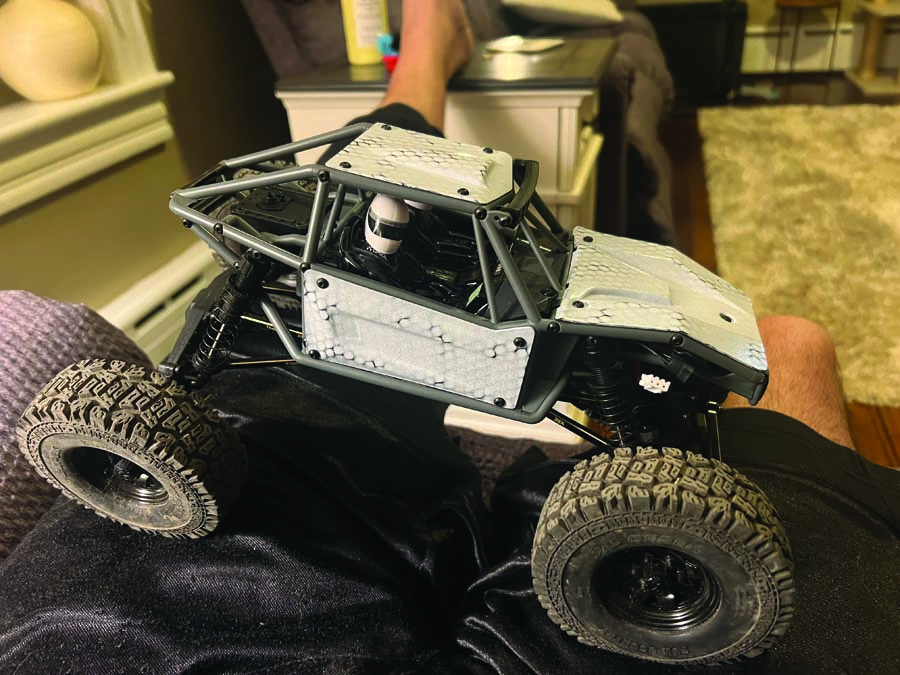
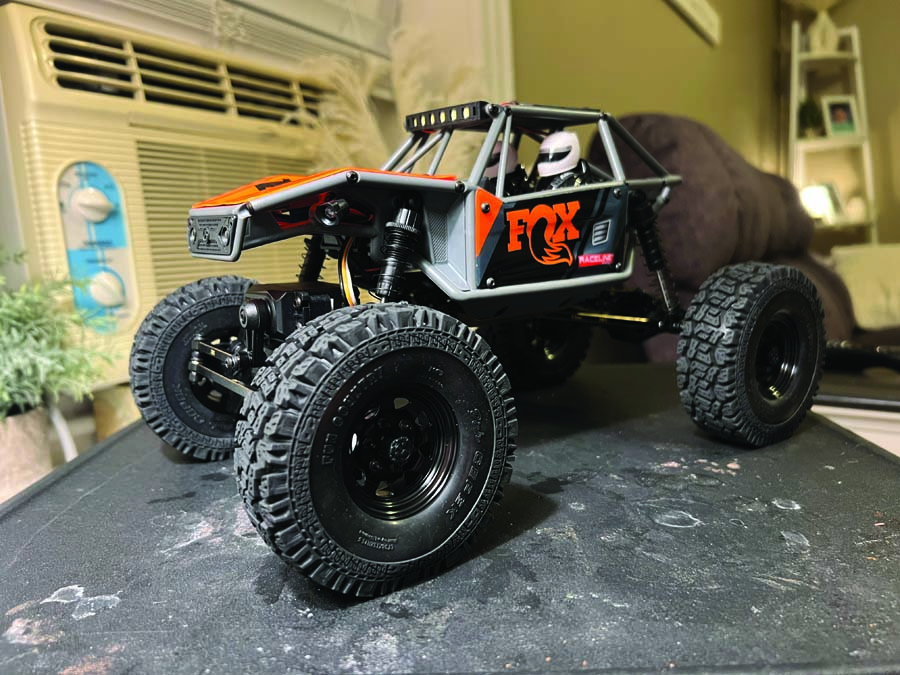
HexCam Axial UTB18
Jeremy Larson « Oley, PA
We dig sticky rock crawlers, and this one looks like it can stick to rock formations with ease. Jeremy shares insights on his rig with us: “I just recently bought a factory-new Axial UTB18 from Model Bahn Ott Inc. in Boyertown, PA, a few weeks ago. I tinkered around with it, knowing what I wanted to do to improve performance and also the way it looked. Having years of custom Kydex pistol holster making experience, I took some scrap pieces of Kydex and found that I had a really unique design. I used Kydex HexCam Specter Micro design for the body panels. I traced the factory body panels onto the Kydex and hand-cut and shaped them to the correct dimensions. For the hood I used a heat gun to form it to the frame and let it cool to permanently hold the shape. Kydex is a thermoplastic that can be heated to be formed to whatever shape or contour is desired. I thought that this direction had never been introduced into the RC car genre, making this a one-of-a-kind design. In the future I plan on doing more custom designs for this platform and possibly sell them to people who want a unique product.” This is an innovative approach, and we think Kydex is a great, hard-wearing material that’s perfect for rock crawlers. It looks like a fun rig to crawl, too. Thanks for showing it to us, Jeremy!
BUILD HIGHLIGHTS
– Chassis: Axial UTB18
– Body: Custom .80 HexCam 3D Specter Micro Kydex
– Motor: Axial UTB18 stock
– Speed Control: Axial UTB18 stock
– Battery: Axial UTB18 stock
– Wheels & Tires: 1.9 Wagon wheels with RC4WD Krypton scale tires and foam
– Shocks: Axial UTB18 stock with 35K shock oil
– Axles: Axial UTB18 stock
– Graphics: Traxxas sticker sheet
– Radio System: Spektrum STX3
– Other Options: DJX brass suspension links/steering arms, RampCrab 9-gram portal covers, RampCrab gearbox bottom plate, 4-piece brass hex adapters, Team Losi 35K shock oil
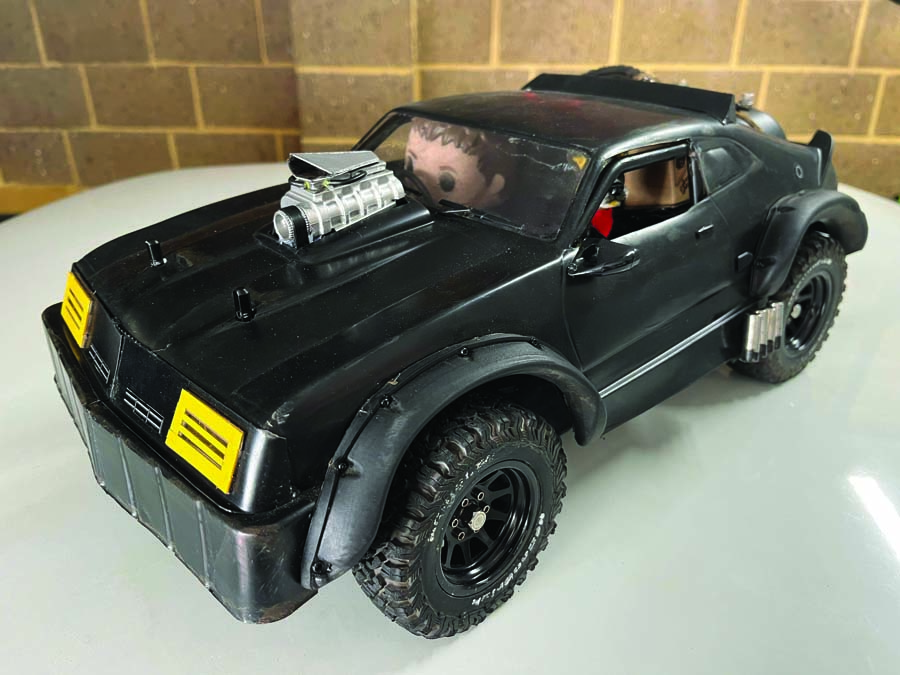
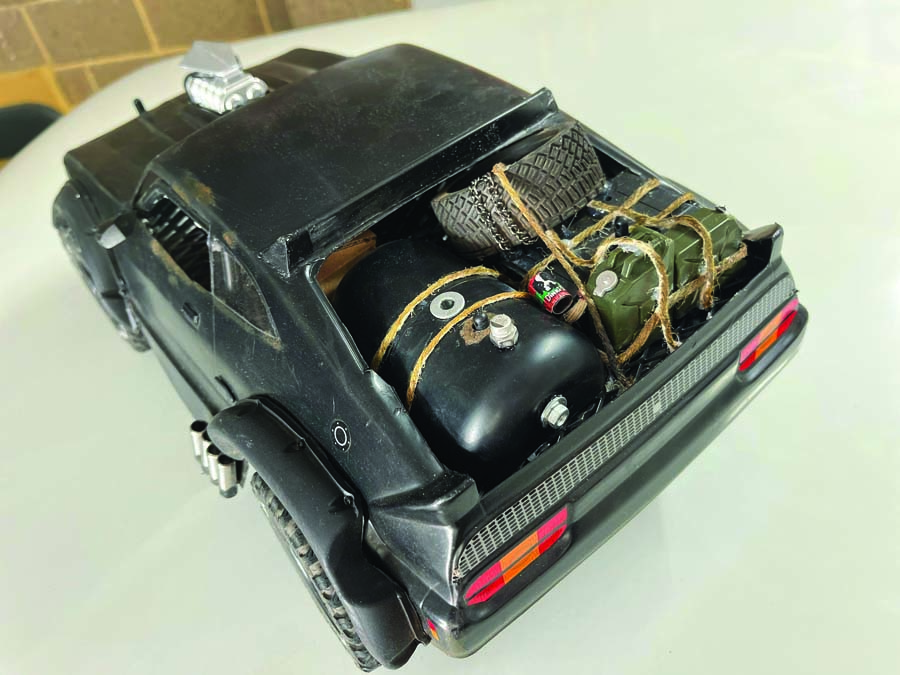
Mad Max Interceptor Remix
Tsu Lee « Aveley, WA, Australia
Mad Max (the original 1979 version) is one of our favorite vehicle-centric movies, and we were thrilled to see this reinterpreted version made from a HSP Flying Fish RC drift vehicle. Appropriately hailing from down under, Tsu Lee shared his cartoonish RC interpretation with us. Complete with a custom-painted eBay bobble head dog and Dinki Di dog food can and box, this RC, while cartoony, is accurate to the movie. In the driver’s seat is a Pop! vinyl Mad Max figure. Tsu reports that it is the Tom Hardy version because the Mel Gibson figure is either not available or too expensive. It looks like a fun car to drift around for sure, thanks for showing it to us, Tsu!
BUILD HIGHLIGHTS
– Chassis: HSP Flying Fish
– Body: Custom Ford Falcon XB Interceptor
– Motor: Hobbywing EZRun 3652SD sensored motor
– Speed Control: Hobbywing EZRun MAX10 G2 80-amp sensored brushless waterproof ESC
– Battery: Zeee 2S 5300mAh 50C
– Wheels & Tires: Injora wheels, generic off-road tires
– Shocks: HSP Flying Fish stock
– Axles: HSP Flying Fish stock
– Radio System: Flysky GT3-C
– Other Options: RPM blower with DIY custom Scott SuperSlot injector hat, eBay accessories—fuel carriers, tire, wheel flares—DIY custom fuel cell tank, DIY custom Dinki Di dog food can and box, custom-painted eBay bobble head dog, Pop! vinyl Mad Max figure


![RC Car Action - RC Cars & Trucks | This 1/3 scale 125cc V10 Buggy is CRAZY [VIDEO]](https://www.rccaraction.com/wp-content/uploads/2018/05/V10-HP.jpg)


 Stay up to date with the latest information, sign up for our FREE newsletter today.
