

Thanks to advancements in battery, motor and small engine technologies, RC vehicles are more powerful than ever. But going fast comes with a price. Cars and trucks are now pushed to extreme limits, and the consequences of running an engine too hot or draining a battery a bit too far can be devastating. To help racers monitor their gear in real-time, many of the more sophisticated radio systems on the market include on-board telemetry systems that communicate critical diagnostic information to the transmitter. Setting up the telemetry system is easy, but setting it up correctly is another thing. If the system isn’t set up correctly, your data will be inaccurate and unusable—which defeats the purpose of telemetry in the first place. We enlisted the help of Craig Kaplan, product manager at Global Hobby, to give some expert advice on setting up the telemetry system on Airtronics’ hot radio system—the MT-4.

SETTING UP THE RECEIVER
Step One: SELECT A GOOD RECEIVER POSITION
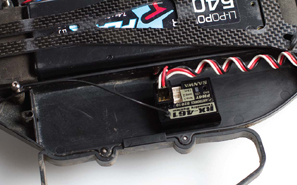
When installing the receiver, it is important to set up the receiver where the sensors will be able to reach the component that they are monitoring. Craig says: “Technically, you can cut the (sensor) wires and extend them, but it’s a little bit of a pain if you’re not someone who’s accomplished in soldering. Drivers with 1/5-scale cars and trucks usually run into this as the engine is quite a distance from where the receiver is located.” Select a receiver position that allows the sensors to reach the components they are monitoring, and keeps the receiver out of harm’s way.
Step Two: PLUG IN THE SENSOR TERMINALS

Most telemetry receivers’ sensor ports are protected with a plastic or rubber cover. Carefully pry the cover off the receiver and install the plugs. Make sure the plugs are fully depressed and aren’t in danger of coming loose. Once the desired plugs are installed, use the spare rubber outlet protectors to fill in the unused plug terminals.
MONITORING NITRO ENGINE TEMPERATURE
Step One: ROUTING AND SECURING THE TEMPERATURE LOOP

After the temperature sensor is plugged into the receiver, it is time to route the sensor and attach it to the engine. According to Craig, “In a nitro-/gas-powered car, you want to place the temperature sensor close to the base of the cylinder head. You can loop the temp sensor around the fins and then draw it tight, and that should give you a fairly accurate reading.” It is important realize that a few millimeters of distance can make a big difference in the accuracy of the temperature sensor, so experiment until you find the ideal spot, while keeping the slack of the sensor wire out of the way of moving parts like servo horns and throttle linkages.
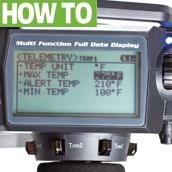
Step Two: SET TEMPERATURE WARNINGS

Engine temperatures are extremely important in nitro applications, as they indicate—among other things—the health and tuning state of the engine. To complicate matters, different-sized engines are designed to run hotter than others. Craig says: “The user must be aware of how hot the engine should run. If you don’t know the characteristics of your engine then the temp sensor doesn’t have any meaning.” Do some research. Find out the desired temperature range of your engine and set the sensor alarm to the high range of the spectrum. Utilizing real-time temperature readings can help you to find the tuning sweet spot for a particular engine, while also increasing its life.
MONITORING ELECTRIC MOTOR TEMPERATURE
Step One: ROUTING AND SECURING THE TEMPERATURE LOOP
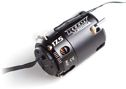
Although electric motor temperature readings are used less than nitro engines, knowing electric temperatures can be very helpful when determining gearing for different track conditions. According to Craig: “For the temp sensor, you simply want to place it as close to the object as possible to get the most accurate reading. In an electric car, usually there is a small crevice next to the motor where you can squeeze the temp sensor next to it and get the readings there.” If no such place exists, tape the sensor to the end bell of the motor and wind it around one of the motor/speed control wires to keep it out of the way.
Step Two: SET TEMPERATURE THRESHOLDS AND WARNINGS
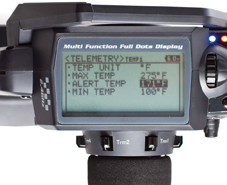
Setting electric motor temperature warnings is more straightforward than nitro applications, since most electric motors are alike in their temperature thresholds. As a good rule of thumb, brushless motors tend to live in the 110–160°F range, so set the temperature warning on the transmitter to 170°F, as temperatures that exceed this amount indicate improper gearing or extreme conditions. With all of the extra friction, brushed motors tend to run hotter, so try setting the temperature warning round 185°f for brushed motors.
MONITORING RECEIVER PACK VOLTAGE

Without installing a thing, the MT-4’s receiver is capable of monitoring the voltage of a receiver pack and relaying the information to the transmitter. Overdraining the receiver pack can have two very negative effects. First, if the receiver pack dies, and you don’t use a failsafe, the vehicle could careen out of control, causing you to damage your vehicle, hurt a turn marshal, or lose a race. Second, overdraining an expensive LiPo receiver pack can cause irreversible damage to the pack itself. As Craig explains, different batteries require different low-voltage warnings: “If the receiver battery (in a nitro/gas car) is a 5-cell NiMH type, you might start off with a voltage reading of about 7.7V. If you notice on your radio that it has dropped to 5.5V then it may be time for you to stop and start to recharge the receiver battery as it’s getting close to dumping. LiPo packs (2S) are obviously higher voltage and should be treated just a hair differently, and the reading on the battery should not go below 6.8 or so.” You can set the transmitter to alert you when the voltage has reached its minimum threshold, or to act as a failsafe and shut down the power completely.
USING MULTIPLE TEMPERATURE SENSORS
The receiver in the MT-4 system is versatile, because it allows the use of multiple temperature sensors simultaneously. It includes one, buy you can purchase an additional sensor which would allow you to monitor two temperatures at once. While the engine/motor should be the focus, you could also attach the other sensor to the speed control or battery to monitor their temperatures as well. This could go a long way in avoiding frying an speed control or battery. Manually check temperatures of your speed control and battery to decide what temperatures are “normal” Under operation, and set the threshold 5–10°F higher than normal, so you are notified if something is going wrong.

WRAP-UP
Recent advancements in batteries and motors have made RC faster than it was a few years ago, and manufacturers are now forced to up the ante in other ways to ensure that consumers and racers can push these new technologies to the limits. Telemetry systems are a great way to monitor critical data to ensure you aren’t about to ruin your components or flameout in the middle of a race. More and more high-end radio systems are now equipped with on-board telemetry systems out-of-the-box, giving users the ultimate in control. With a little common sense and following some helpful tips, everyone can get the most out of their new telemetry radio.
SOURCES
- Airtronics airtronics.net


![RC Car Action - RC Cars & Trucks | This 1/3 scale 125cc V10 Buggy is CRAZY [VIDEO]](https://www.rccaraction.com/wp-content/uploads/2018/05/V10-HP.jpg)


 Stay up to date with the latest information, sign up for our FREE newsletter today.
