

PHOTOS HOPE McCALL
CERTAIN SKILLS IN RC separate the pros from the Joes. One such task definitely is building shocks. Eventually, you will have to rebuild the shocks on your RTR, or you’ll have to build them for a kit. How well you perform this task will directly impact how well your vehicle performs on the track. Build them wrong, and you’ll be bouncing out of control on your way to last place. Build them right, and you’ll be smoothly taking corners and soaking up jumps as you head to victory lane.
1 START CLEAN.

A clean work area is a must. All you need is a layer of paper towels to ensure dirt won’t ruin an otherwise good build.
When building shocks, you don’t want any dirt messing up the build. Before you start, cover your work area with a clean towel or, even better, lint-free paper towels. If you’re rebuilding used shocks, clean them thoroughly with motor spray, nitro cleaner, or denatured alcohol.
2 COAT THE O-RINGS.

Coat the O-rings with lube to protect them and to reduce friction.
All shocks are sealed with O-rings. To protect the O-rings during the build process, and to eliminate friction, before you assemble the shock bodies, place each O-ring in your palm and liberally coat it with thick shock fluid or a purpose-built lube such as Associated’s Green Slime or Muchmore’s V Made Shock Slime.
3 PREP THE SEALS.

This sharp flush cutter makes quick work of any imperfections in the molded-plastic parts.
Several shock seal designs are used in RC. Some install in the bottom of the shock body and are held in by a cap. Others insert from the bottom or from inside the shock body and are retained by a snap-in clip. Regardless of how they assemble, the key is to carefully remove all burrs and flashing from the molded-plastic pieces.
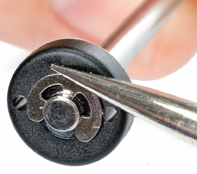
4 INSTALL THE SEALS.

Make sure the seal pieces are evenly seated.
After you’ve lubed the O-rings and deburred the plastic spacers, carefully install the pieces according to the instructions. Make sure all the parts are evenly seated and that the seal cap is snug or that the retaining clip snaps into place.
5 PISTONS.
Make sure the tiny E-clips are fully seated when installing the pistons.
When installing the pistons on the shock shafts, be sure that the E-clips on either side of the piston are fully seated. A small flat blade screwdriver works well to snap the clips in place.
6 INSTALL THE SHAFT.

Push the shock shaft in slow and straight to avoid damaging the O-rings.
When installing the shaft, it is essential that you push it in slowly, smoothly and straight down. Failure to do so may damage the O-rings and cause a leaky or sticky shock.
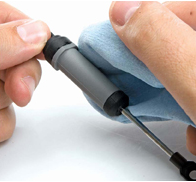
7 INSTALL THE SHOCK EYES.

Do not grab the shock shaft with ordinary pliers, or you’ll scratch it. These shock pliers are from STRC.
Installing the shock eyes on the shaft can be a pain, but don’t grab the shock shafts with ordinary pliers. Instead, use purpose-built shock pliers, or grab the end of the shaft’s threads with side cutters. Also make sure each eye is threaded on in exactly the same amount.
8 FILL THE SHOCK.

Fill each shock slowly, and then work the shaft up and down to release trapped air bubbles.
Filling the shocks with fluid is simple yet still easy to get wrong. Fill each shock, and then work the shock up and down to release any trapped air. Prop the shocks in an upright position in a shock holder, or use a car stand with built-in shock holders. Let the shocks sit, and the air bubbles will rise and release. Fill the shocks to the top with an equal amount of fluid in each. Read the instructions for the exact amount of fluid needed.
9 BLEED THE SHOCKS.
Check that the shocks have identical rebound.
After the shocks have been filled with fluid, install the caps and check that each shock has the same rebound. The shocks should fully compress and rebound slowly the same amount. If the shocks don’t fully compress or rebound too fast, they may have too much fluid; if they have no rebound, they probably have too little fluid. The key is to have the same amount of rebound.
10 CLEAN UP.

You’ve finished building. Now clean each shock with motor spray.
When you have finished assembling the shocks, thoroughly clean them with a paper towel soaked in motor spray or similar cleaner. This will prevent dirt from sticking and make it easier to spot future leaks.
SOURCES
- Associated rc10.com
- Muchmore muchmore.com
- STRC teamstrc.com
- Traxxas traxxas.com


![RC Car Action - RC Cars & Trucks | This 1/3 scale 125cc V10 Buggy is CRAZY [VIDEO]](https://www.rccaraction.com/wp-content/uploads/2018/05/V10-HP.jpg)


 Stay up to date with the latest information, sign up for our FREE newsletter today.
